

How to Build a Pushbot Robot

Let's begin at the beginning. What is a pushbot? A pushbot is a two-wheel drive robot that has two motors powering the back wheels. In this article, you will learn why building a pushbot is a great beginner project for students involved with robotics and what can be learned in the process. Discover the materials that are required and review a summary of the steps taken to build a pushbot using the FTC Starter Kit from Studica Robotics. The components from Studica Robotics are durable, strong, and safe making them ideal for students and robotics teams. You can also access a detailed Pushbot Build Guide.
Why Build a Pushbot?
Building a pushbot is an interactive, hands-on project that can be used to teach learners the basics of the engineering process. This exercise teaches about design, the basics of building a robot, and programming. It can also be extended to building a basic mechanism for the robot and understanding its functionality. If you are looking to get students acclimated to robotics, this is an ideal place to start. Consider it as a prerequisite to a more complicated drivebase build. Easily digestible for new builders, the design and programming for a pushbot are simple which allows the process of building other mechanisms for this robot to be straightforward. There is great flexibility as this project can be completed individually or as a group. Its simplicity makes it a quick starter project, as this pushbot can be built in about a day.
Materials Needed

All the materials that you will need to build a pushbot are included in the FTC Starter Kit from Studica Robotics. The included channel components are 3mm thick 6061-T6 aluminum that is deburred, blue-anodized, and polished making your project strong and safe. This build requires a combination of structure components, motion components, and hardware. For structure, you will need a variety of U-channel parts, end piece plates, motor mount plates, bumpers, flat brackets, and battery clips. For motion, you will need a gearmotor, D-shafts, drive wheels, omni wheels, collar clamps, clamping shaft hubs, flanged ball bearings, and tooth bevel gears. Hardware required includes screw spacers, socket head cap screws, button head caps screws, and kep nuts. Review the complete list of items needed.
Pushbot Build Instructions
This is a summary of the steps needed to complete this simple build. (You can also view detailed, step-by-step pushbot building instructions with visual reference here.) For this build, the Drive Wheels will be powered by the motors at the rear of the robot, while the omni wheels will spin freely and assist in pivoting mobility. First, you will assemble your frame. You will add end piece plates to your U-channels. You decide if you prefer to use 192 mm U-channel pieces that will create a slimmer base or 240 mm U-channel pieces for a wider base. The mechanisms you plan to add to your robot will be a key factor in this decision. Then you connect the pieces to create the frame. 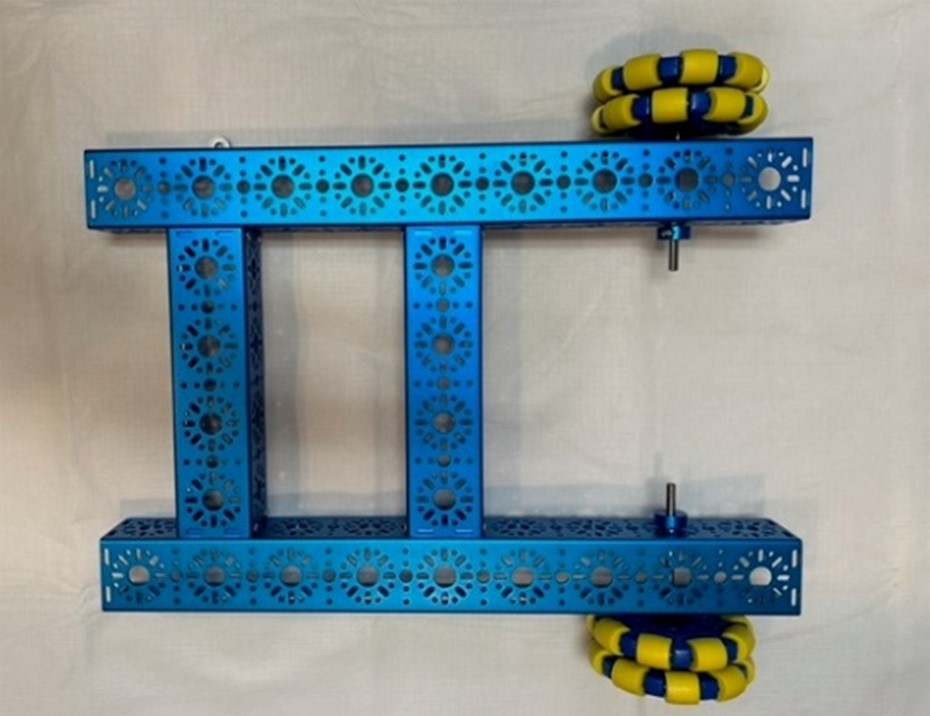
Then you will add your motion components and complete the final assembly. You will need to connect the motor mount plates with the gearmotor. Then slide the tooth bevel gears onto the gear motors. These gears must be about flush with the end of the motor shaft (Adjust accordingly later in the build so the gears mesh). The motors then recess into the 432mm U-Channels and are screwed onto one another. Then you add the hubs to the wheels. For the final assembly, you will add in your flange bearings and insert the wheels with spacers to reduce friction between the bearings and wheel hubs. Then you can add in the wheel shaft through the bearing and Tooth Bevel Gear. Tighten your frame and check to make sure that the Bevel Gears fit well and then screw into place. You also clamp the other end of the wheel shafts with the D-shaft clamps. Then add flat brackets across the drive base. Need help? View detailed instructions with images.
Adding a Controller and Battery
Once your drivebase is ready you can add your controller and battery. For FTC teams, you will need to use the REV controller. Every robot is unique so you can decide where to place these items. You can also create additional mechanisms for your pushbot. 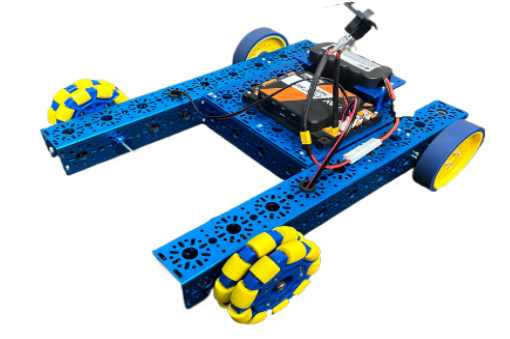
Coding your Pushbot
The Blocks code for making your robot move is below. You will use the right and left triggers on your robotics controller for forward and backward movement. The left stick will be used for right and left turns. If you test your code and the robot drives backward, simply change the direction of either the left or right motor. 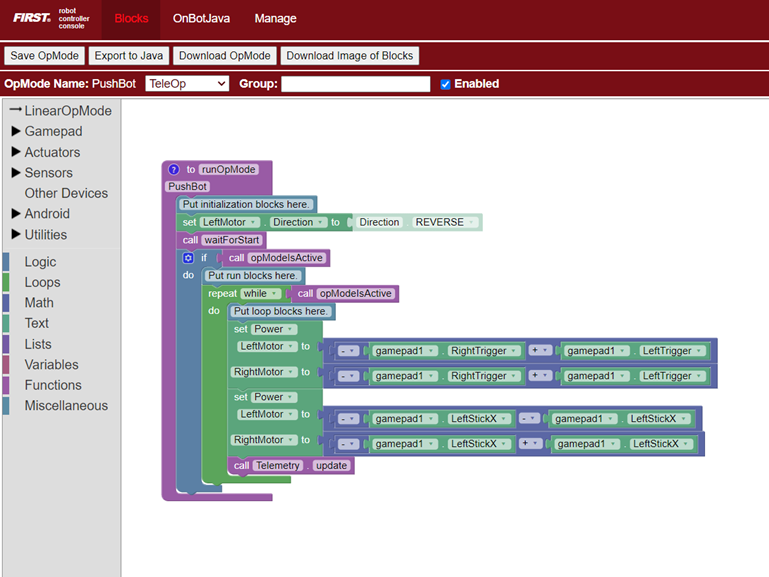 In summary, building a pushbot is a great project for teaching the basics of mobile robotics. It is a simple, flexible, and quick build. All the materials required are contained in the FTC Starter Kit from Studica Robotics. You can view the detailed building guide here or view as as a PDF. Happy building!